I mentioned in an earlier post that I like to make a small custom boot CD to launch unattended ESX server installs using network located install files. I even promised to blog about the way I do that CD, well here is that blog.
The first thing to know is that we are using the excellent ISOLinux to get started, this is used by Linux distributions to get boot from CD working. The normal ESX install uses ISOLinux and as of ESX 3.5 the normal install CD even contains a cut down minimal 3 MB boot CD image, this is what we will use as our basis. We will then customise the boot options and menu from this CD and make a new one with our own options in it. Read on for the process
First assemble your materials, I work with Windows so I’m going to make my CD using windows tools. This can definitely be done with other OSs but I don’t know how to!
Things you need
- boot.iso from your ESX install media, it is in \images on the ESX install CD
- Something to extract the contents of the boot.iso file, I use winISO
- A “clean†text editor, one that doesn’t change LF into CRLF, I use Crimson
- A copy of MKISOFS for windows
- The URL for your unattended setup (Kickstart) file
The process
- Extract the boot.iso file to a folder on your PC
- In the extracted folder isolinux open the file isolinux.cfg with your clean editor
- This file controls the behaviour of ISOLinux, it is setting up the menu options that are active when the ESX splash screen first come up
- Copy the “Label ESX†chunk, change the label and add the URL for your unattended setup file
Here is an example:
default ESX
prompt 1
timeout 0
display boot.msg
label esx
kernel vmlinuz
append initrd=initrd.img
label text
kernel vmlinuz
append initrd=initrd.img text
label S01
kernel vmlinuz
append initrd=initrd.img ks=ftp://192.168.183.33/ESX/ks/ESXS01.ks ksdevice=eth0
- Now save the file and open boot.msg with your clean editor
- This file controls what is displayed on screen while ISOLinux waits for an install choice, the extended characters control on screen highlighting and the file splassh.lss is the VMware splash screen, which you may choose to replace or remove.
Here’s an example:
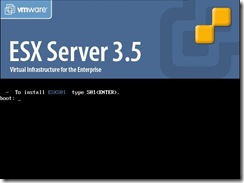
splash.lss- To install 03ESXS0107 type 0fS01<ENTER>07.
- Once boot.msg is saved you are ready to use mkisofs to create a new CDROM.
- I have had to place the file isolinux.bin in the root directory of my extracted copy of boot.iso, I usually also put mkisofs.exe there along with a one line batch file:
mkisofs.exe -l -J -R -r -T -iso-level 4 -boot-info-table -b isolinux.bin -c boot.cat -no-emul-boot -boot-load-size 4 -o "..\CustomESX.iso" .
- Run the script and you will get a nice shiny new iso file with your options and menu.
Using the CDROM
I use HP servers with ILO cards for my ESX servers in my lab so I can use the Virtual Media control to present my newly created ISO and boot, here’s a screen grab of the menu hat is the result of our work above, the server will stay at that menu until I type S01 and press <Enter>, then it will download the Kickstart file from my FTP server & proceed to download the install files from the same server.
If you would like a single boot CD that can be used to build multiple ESX servers (that sounds useful) then simply repeat the Label section in the isolinux.cfg file for each server, changing the label and the Kickstart file name for each server, also repeat the menu line for each server in the boot.msg file.
In a coming post I will talk about having a single post script that is shared by all of your ESX servers, rather than embedding the post script into the Kickstart file.
Happy building.
© 2008, Alastair. All rights reserved.


 RSS - Posts