Ansible is an easy tool to start using for declarative configuration. I use Ansible to make sure a small fleet of Linux VMs are configured exactly the same each time I deploy them. In my last Cohesity video and post, I showed you how to deploy the Ansible role for Cohesity and gather information about your Cohesity cluster. Today we get to the real use of Ansible, integrating the protection of a fleet of physical servers with our Cohesity platform. The playbook I created from the samples deploys the Cohesity agent, adds the physical server as a source, and then adds the source to a protection job. You can watch me copy and paste from the samples and run the playbook in this video on YouTube.

Disclosure: This post is part of my work with Cohesity.
The physical servers (Intel NUCs) have Ubuntu Linux installed and updated. Then I completed the usual Ansible setup: setting up pre-shared keys for SSH authentication, allowing the SSH user to SUDO without a password, and installing Python. There is nothing Cohesity specific in that process, so I have not included it here, or in the video.
I started with the Cohesity Agent Management demo, although I removed the task that uninstalls the agent, just using the install. Then I added the Cohesity Source Management demo to add the Linux machines as sources in my cluster. Finally, I used the Job Management demo to create a Protection job or add a new Linux box to the existing job.
Here is the resulting playbook:
# => Cohesity Agent Management

# =>

# => Role: cohesity.cohesity_ansible_role

# =>

# => Install the Cohesity Agent on each Linux host

# => specified in the Ansible inventory

# =>

---

- hosts: linux

# => We need to specify these variables to connect

# => to the Cohesity cluster

vars:

var_cohesity_server: cohesity_cluster_vip

var_cohesity_admin: "{{ username }}"

var_cohesity_password: "{{ password }}"

var_validate_certs: False

# => We need to gather facts to determine the OS type of

# => the machine

gather_facts: yes

become: true

roles:

- cohesity.cohesity_ansible_role

tasks:

- name: Install new Cohesity Agent on each Linux Server

include_role:

name: cohesity.cohesity_ansible_role

tasks_from: agent

vars:

cohesity_server: "{{ var_cohesity_server }}"

cohesity_admin: "{{ var_cohesity_admin }}"

cohesity_password: "{{ var_cohesity_password }}"

cohesity_validate_certs: "{{ var_validate_certs }}"

cohesity_agent:

state: present

# => Cycle through each member of the Ansible Group [linux] and register as a Cohesity Protection Source

- name: Create new Protection Source for each Physical Server

include_role:

name: cohesity.cohesity_ansible_role

tasks_from: source

vars:

cohesity_server: "{{ var_cohesity_server }}"

cohesity_admin: "{{ var_cohesity_admin }}"

cohesity_password: "{{ var_cohesity_password }}"

cohesity_validate_certs: "{{ var_validate_certs }}"

cohesity_source:

state: present

endpoint: "{{ item }}"

host_type: "{{ hostvars[item]['type'] }}"

with_items: "{{ groups['linux'] }}"

- name: Create new Protection Job for Physical linux Servers

include_role:

name: cohesity.cohesity_ansible_role

tasks_from: job

vars:

cohesity_server: "{{ var_cohesity_server }}"

cohesity_admin: "{{ var_cohesity_admin }}"

cohesity_password: "{{ var_cohesity_password }}"

cohesity_validate_certs: "{{ var_validate_certs }}"

cohesity_protection:

state: present

job_name: "protect_physical_linux"

sources:

- endpoint : "{{ item }}"

paths:

- includeFilePath: "/"

skipNestedVolumes: False

with_items: "{{ groups['linux'] }}"
Naturally, I had to add the Linux machines to my Ansible inventory file. I used the default inventory file /etc/ansible/hosts. You could use a custom path and specify the inventory file on the command line. The Source Management task did require that the inventory file also specify what operating system type was in the instances. You could remove this requirement and specify the operating system in the task if you chose, particularly if you only have one operating system type that you manage with Ansible. Here is my inventory file:
[workstation]

127.0.0.1 ansible_connection=local

[linux]

192.168.111.132

192.168.111.135

[linux:vars]

type=Linux
I ran the playbook using the command:
ansible-playbook Cohesity-linux.yml
The two physical Linux boxes showed up as sources in my Cohesity console:
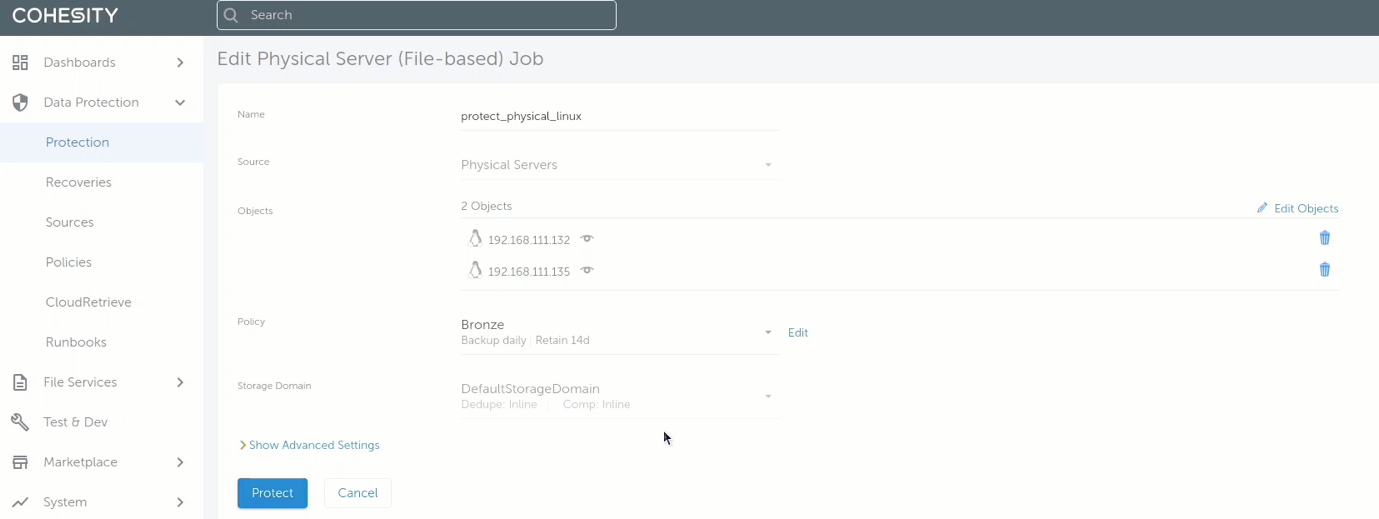
And they were both included in the protection job:
There does seem to be something odd about the handling of directory excludes in the protection task, so I removed the excludes and protect the entire file system.
Sometimes the playbook would run with errors about sources already existing. In my experience simply re-running the playbook clears these errors, maybe the role needs to handle errors better, maybe it is the agent uninstall that is not clean. I would also like the playbook to run with all tasks reporting OK if there is no change. Unfortunately, the agent deployment task always returns a change for enabling the firewall.
If you have a fleet of physical servers that you would like to protect with Cohesity, this Ansible role will make it much simpler to set up this protection. If you already use Ansible to do operating system and application configuration, this is an obvious tool for configuring data protection.
© 2020, Alastair. All rights reserved.


 RSS - Posts